Sunday 27 January 2013

SharePoint 2013 and Maximum Degree of Parallelism

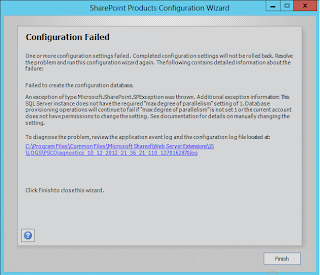
Yesterday while installing SharePoint 2013 on production environment I encountered an issue stating that
"This SQL Server instance does not have the required "max degree of parallelism" setting of 1. Database provisioning operations will continue to fail if "max degree of parallelism" is not set 1 or the current account does not have permissions to change the setting."

Now, this is weird. I was simply trying to run a Powershell script for creating the Configuration as well as Other Content DB's required for my SharePoint Installation. I tried to run the SharePoint Configuration Wizard , which I was pretty sure would not work for me. And I was right. Boom the error came with the Configuration Wizard as well.


I tried to do some research across what this error actually mean and why I am getting this error.

It is important to note here that , if you are running the wizard for the first time itself with a user account that has sysadmin rights on SQL Server, then it will automatically make these changes in the SQL and you will not be required to do any of the below mentioned steps that I will be explaining shortly.

First , for all those, who are not aware of what maximum degree of parallelism means (just like me :p), I would explain what it means and then I will explain the error.

Maximum Degree of Parallelism -
It means number of processors that SQL Server use for one query. If SQL has to return lot of records then if we use the concept of Parallelism , then it breaks the query into smaller queries and each small query returns a subset of the records. All these queries run parallely on different threads.

By default the Maximum Degree of Parallelism is set to 0. It means that SQL can use all the processors available to execute a single query.

The decision whether to follow the Parallel Exceution Plan or Serial Execution Plan depends upon scenario to scenario. In case of OLTP systems, where queries are relatively smaller and they return less number of records, it is best to follow Serial Plan with Maximum Degree of Parallelism set to 1. However, in case of OLAP systems, where the queries are quite complex, it is preferable to go for Parallel Execution Plan with Degree of Parallelism set to 0.

Parallel Execution Plan has its own set of advantages and disadvantages. At one place it reduces the query execution time and on the other hand, by using multiple CPU's to execute single query, it consumes lot of CPU's as a result increasing CPU utilization. The same query may take different intervals at different time. As a result, query time is non-deterministic.

I hope, now you might have got some basic idea as to what Maximum Degree of Parallelism is. Coming back to SharePoint, in SharePoint 2010, setting Maximum Degree of Parallelism option was recommended to be set as 1 , but is was optional and not mandatory.
However, in case of SharePoint 2013, it is required to set this to 1 otherwise the configuration wizard will fail.

Below are the detailed steps :-

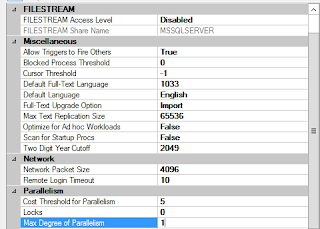
  1. Check in SQL Sever, whether the Configuration Database exists. If it exists then delete it.
  2. From SQL Server Management Studio, right click on your server and click Properties.
  3. Under Advanced group, modify the value of Maximum Degree of Parallelism to 1.


   4. Run the configuration wizard again.

Now, you will successfully be able to run the wizard.

Sunday 20 January 2013

Configure Anonymous Access for SharePoint 2013 site with Javascript Client Object Model

Recently I came across a requirement to enable anonymous access for SharePoint 2013 site. Now, this seems to be a very simple requirement but the twist here was that anonymous access should work with ECMASCRIPT. Had it been server side code, we could have simply executed our code within run with elevated privilleges and thats it. But with javascript, this is not possible. In this blog post I will explain how this can be achieved.

First of all, for anonymous access to work , we need to enable anonymous access at both web application level as well as site collection level.

In central admin, when we are creating a new web application, we get an option to make the web application  available anonymously.


Next thing required is that we need to set up the anonymous access at the site collection level. To do this , we need to go to Site Settings -> Site Permissions. There we find an option for Anonymous Access. Clicking on that will provide us a popup where we can enable anonymous access for the site collection.


The above two steps would have been enough for server side code. But if you are working with Javascript Client Object Model, there are additional things that needs to be done before being able to access a site anonymously.
With JavaScript Client Object Model (JSCOM), the anonymous user gets Microsoft.SharePoint.Client.ApiBlockedException. As a result when user tries to access a site anonymously where something is being fetched based on JSCOM, he will get Access Denied Exception because of the blocked API. The solution for this problem lies hidden in the ClientCallableSettings of the SPWebApplication object. This property controls which API are prohibited in the Client OM. With the help of powershell we can remove these blocked API's from the web application.


If you look at the above powershell script, you will see SPList in AnonymousRestrictedTypes. In Client Object Model, the following API's are restricted in ClientCallableSettings


  • SPSite.GetChanges()
  • SPWeb.GetChanges()
  • SPWeb.GetSubwebsForCurrentUser()
  • SPList.GetChanges()
  • SPList.GetItems()
It is the restriction on GetItems() that prevents the anonymous users from fetching listitems using JSCOM.
Therefore we need to remove this restriction in order to enable anonymous access. Following powershell command will remove this restriction on web application level


By running the above command we can get away with the API restriction on GetItems() in case of Client Object Model.

Now, the next thing that needs to be done is to go to central admin. There go to Application Management  and select Manage Web Applications. Select your web application and click on the Authentication Providers in the ribbon.It will open a dialog box as shown below.


Click on Default link. It will open another dialog box. There you will find an option saying Require Remote Interfaces Permission. Uncheck this checkbox and save.


Now, your site is configured to support anonymous access with Javascript Client Object Model with anonymous users having View Item permission on the list. In case you want to allow anonymous users to perform some POST action as well, like Add an Item to the list , you need to break permission inheritance and give Add Items permission as well to anonymous users.


And this is it. Now anonymous users can GET and POST data to sharepoint site using JSCOM.

Hope this helps !!

Cheers,
Geetanjali


Export List Data to Excel in SharePoint


​​Recently I came across a requirement where I had to export data of a list from inside a custom webpart to excel. After some research I came across many articles stating creating SPGridView and then using HTTPcontext Response object to write the response into an excel file.But out of curiosity I thought of diving into the OOB export functionality of SharePoint list. Firebug came to my support and I observed that when we click on the Export to Excel link in the SharePoint OOB list then it makes an RPC call using owssvr.dll. We can do a lot many things using this and exporting to excel is one of those.

Assuming an export button on the page and you need to export to excel on the click event of the same, you simply need to do the following

jQuery('.export').live('click', function (e) {

window.location = {site url} + "/_vti_bin/owssvr.dll?CS=109&Using=_layouts/query.iqy&List=" + {list guid} + "&View=" + {view guid} + "&CacheControl=1";

});

{site url} -  url of the site
{list guid} - GUID of the list
{view guid} - GUID of the view

You can programmatically fetch the list guid as well as view guid and then you are good to go.
Thats pretty much it and you will be able to export the data to excel :)

Cheers,
Geetanjali

Listing all the webparts in a particular group


Problem : Listing all the webparts that belong to a particular group

Analysis : Well, all the webparts that we have deployed to our sharepoint site can be seen in the WebPart Gallery which acts as a repository for all the webparts that we can add on a webpart page. Now to find which webpart belongs to which group this is the place we should be looking to.

Solution : SharePoint Object Model provides us the flexibility to iterate through lists and fetch results based upon our requirement.

Here in this case Web Part Gallery is nothing but a list only. Those who have even the slightest doubt , I am fully prepared with the below screenshot .

All the lists get stored in AllLists table in the content database. If you open it then you can see an entry for Web Part Gallery there.


So, once we know that Web Part Gallery is a list we are half done. :)

Object Model provides us many classes through which we can easily fetch the data from sharepoint. SPList class helps us in fetching information from a SharePoint list.

Web Part Gallery has a field called Group. So, the entire problem gets shortened up to one thing i.e. fetching data from a list where the value of one field is something.

Easy :) I know all of you must have by now anticipated the solution already but still would like to give the finishing touch by adding the code snippet... We developers see code everywhere and can't live without putting them here and there... :p

                SPSite currentSite = SPContext.Current.Site;
                SPWeb web = currentSite.OpenWeb();
                SPList list = web.Lists["Web Part Gallery"];
                SPQuery query = new SPQuery();
                query.Query = "<Where><Eq><FieldRef Name='Group' /><Value Type='Text'>Name of the group</Value></Eq></Where>";
                SPListItemCollection itemCollection= list.GetItems(query);

Great ! Now we have the list of all the webparts that belong to a particular group. Hope this might help you somewhere.

Regards,

Geetanjali Arora


Creating Custom Activity Type - Part 3


​Hello Readers,

Welcome back to the Part 3 of this series on creating custom activity type. Just to recap in Part 1 you read about how to get the custom activity type available in your settings page in addition to OOB SharePoint  types. In Part 2 you read about how to get feed related to your custom feed type in your colleagues feed as well as in your feed. So functionality wise we have been able to cover everything. But there is one thing still pending and that is what is happening behind the scenes. When I was trying to implement this feature, I was very anxious in knowing where is the data actually going? So, i explored the content db and found out that it modifies the PROFILE DB and SOCIAL DB. The various tables of interest here are


  1. ActivityPreference : This is the table that acts as a filter. If you remember, when you go to your  newsfeed settings page and try to track down all the activities that you are following then by default you will observe that everything is coming selected. If for any user , all the options are selected for following then there will be NO entry created in the ActivityPreference table. It will create an entry only if any user selects some limited options i.e. why a filter.
  2. ActivityTemplate :  As the name suggests, it is the template for our activity type. We define the Activity Template inside a resource file.The ActivityTemplate table contains the list for all the activity types. Below is the screenshot of this table where if you observe, in the ActivityTemplateId we have the unique ID for our CustomActivityType. If you recall , in Part 1, we had created an ActivityTemplate and ActivityType. Try debugging the code and check the value of these id's and then open up this table in your Profile DB and you will see a record gets created here for your custom activity template.

 
    3. ActivityApplication : If you recall, to start with creating a custom activity type, we had first of all created a custom Activity Application. This information gets stored in the ActivityApplication table in the ProfileDB.


 4.  ActivityType : This table contains the list of all the activity types created. In the table below, if you observe we have our custom Activity Type. If you observe carefully, there is a relation between all these tables that maps one thing to the other like the ActivityTypeId , ApplicationID, ApplicationTemplateId etc.


 5. ActivityEventsConsolidated : This table contains all the events that will appear in the colleagues  newfeed page.


 6. ActivityEventsPublished : This table contains all the events that will appear in the publisher's Recent activities webpart.


So, here I come to the end of the series of the blog posts on custom activity type. I hope that by now you must have got some idea on how to achieve this functionality.


Happy SharePointing !!!!!!

- Geetanjali


Saturday 19 January 2013

Creating Custom Activity Type - Part 2


​In the previous blog on creating custom activity type Part 1​ , I have shown how to add a custom activity type to appear in the Newsfeed Settings page. In this part I will show how to create activity events so that it starts  to appear in your activity feed. The most important object that you require in order to create an Activity Event is the ActivityManager. But it brings with it some problems. If you look at MSDN , ActivityManager has a constructor


public ActivityManager(
UserProfile userProfile,
SPServiceContext serviceContext
)


Parameters
userProfile : This value must be identical to the UserProfile object that represents the current user.
serviceContext : Default context for this ActivityManager

Here is the problem. The constructor says that the userProfile MUST represent the current user. Now, what will happen if the logged in user is not the administrator and is a normal user with limited permissions?
The user will get an error message stating that the user does not have the required permissions. As a SharePoint developer, we can think of elevating the SPSite object and passing the System Account user to create the ActivityManager object. But it is not simple as it seems to be. Even though you pass the elevated user, still it will pick user from the current context. So how to go about solving this problem. The solution that works over here is to modify the HTTPContext. It seems that the User Profile Service Application depends
upon the HTTPContext . So the workaround to solve this issue is that we need to store the current HTTPContext  in some temporary variable so that later you can set the context back to  the original, impersonate the context, perform your operations and finally set the context back to the original one. Below is the code snippet as to how you can do the same.


HttpContext httpContext = HttpContext.Current;
SPUser user = SPContext.Current.Web.CurrentUser;
string userName = user.LoginName;
try
{
    SPServiceContext currentContext = SPServiceContext.Current;
    HttpRequest request = new HttpRequest("", web.Url, "");
    HttpContext.Current = new HttpContext(request, new HttpResponse(new          StringWriter(CultureInfo.CurrentCulture)));
    HttpContext.Current.Items["HttpHandlerSPWeb"] = web;
             
    WindowsIdentity wi = WindowsIdentity.GetCurrent();
    typeof(WindowsIdentity).GetField("m_name", BindingFlags.NonPublic | BindingFlags.Instance).SetValue(wi, adminUser);
    HttpContext.Current.User = new GenericPrincipal(wi, new string[0]);
             
    serviceContext = SPServiceContext.GetContext(HttpContext.Current);
    UserProfileManager pm = new UserProfileManager(serviceContext);
    UserProfile current = null;
             
    if (pm != null)
    {
        SPUser adminUser = web.EnsureUser(adminUser);
        if (user.IsSiteAdmin)
            current = upm.GetUserProfile(adminUser.LoginName);
        HttpContext.Current.Response.Write(current);

    }
    if (current != null)
        actMgr = new Microsoft.Office.Server.ActivityFeed.ActivityManager(current, serviceContext);
             
}
catch (Exception ex)
{
}
finally
{    
    //undo the impersonated httpcontext very much required
    HttpContext.Current = httpContext;
    WindowsIdentity wi = WindowsIdentity.GetCurrent();
    typeof(WindowsIdentity).GetField("m_name", BindingFlags.NonPublic | BindingFlags.Instance).SetValue(wi, userName);
    HttpContext.Current.User = new GenericPrincipal(wi, new string[0]);
}

So, if you observe the above code snippet, First store the HTTPContext in a temporary variable httpContext. Second, generate a new context with impersonated user who has the permissions on the User Profile Service Application. Generate the ActivityManager instance using the elevated context. If you  observe now, you will not get any Permission related issue now. Please note that in the finally clause, we are setting the context back to the original one. It is IMPORTANT to set it back to original for obvious reasons. Having successfully generating the ActivityManager instance, you are very near to achieveing the actual motive and i.e. to have a custom feed in your Newsfeed settings page. Next step is to Create an event that will appear in your feed. Below is the sample code snippet to achieve this.


if (actMgr != null)
{
    long aId = actMgr.ActivityApplications["ActivityThemeApplication"].ActivityTypes["ActivityThemeType"].ActivityTypeId;
    if (aId != 0)
    {
        foreach (Colleague colleague in loggedInUser.Colleagues.GetItems())
        {
            CreateEvent(cssFilename, aId, colleague.Profile, actMgr, loggedInUser, themePageURL);
        }
    }
}
public void CreateEvent(string theme, long aId, UserProfile colleagueProfile, Microsoft.Office.Server.ActivityFeed.ActivityManager actMgr, UserProfile loggedInUser,string themePageURL)
{
    try
    {
             
      if (colleagueProfile != null)
      {
          Entity publisher = new MinimalPerson(loggedInUser).CreateEntity(actMgr);
          Entity owner = new MinimalPerson(colleagueProfile).CreateEntity(actMgr);
          ActivityEvent activityEvent = ActivityEvent.CreateActivityEvent(actMgr, aId, owner, publisher);
          activityEvent.Name = "ActivityThemeType";
          activityEvent.ItemPrivacy = (int)Privacy.Public;
          activityEvent.Owner = owner;
          activityEvent.Publisher = publisher;
          Link link = new Link();
          link.Name = "Click here to change your theme." ;
          link.Href = SPContext.Current.Site.Url + themePageURL;
          activityEvent.Link = link;
          activityEvent.Value = theme;
          activityEvent.Commit();
     
       }
     }
     catch (Exception ex)
     {
     }
}


loggedInUser : User Profile of the current logged in user
cssFileName  : It can be anything. In this case, this is the name of the theme that I want to set.
themePageURL : In this case this is the link for my custom page where users can change their themes. It appears in the newsfeed where colleagues can click to change their theme.


In the above code snippet, we are pushing this custom feed in the newsfeed page of all the colleagues of the current logged in user. Publisher is the current logged in user who is changing his theme and Owner is the colleague in whose newsfeed we want the notification to appear. Rest of the code is self-explanatory. The end result is that whenever a person changes his theme then all his colleagues will be notified of this change. In-case you want this to appear in the Recent Activities of the current logged in user who is changing the
theme, then there is a slight modification. In that case you simply need to sent the Owner and Publisher as the same and that is the current logged in user and that is it.


So we can see our custom type in the newsfeed. :)

In the next part I will explain what happens at the backend behind the scenes. Till then keep exploring. :)

- Geetanjali


Creating Custom Activity Type - Part 1


SharePoint 2010 provides us with an excellent feature in the Mysites where we can see our most recent activities using the Recent Activities webpart and the activities of our colleagues by using the NewsFeed webpart. Now the point of interest here is that OOB we can only see feeds for the activity types that SharePoint provides us. The activity feed available OOB collects data from two areas

First is the User Profile changes such as Job Title , Colleague Changes, Birthdays etc and the second is around the social feedback events like tags, new blog posts etc.


We have a scheduled Timer Job which generates new activity events for an individual which are broadcasted to individual's colleagues.

SharePoint 2010 provides two OOB webparts, one shows the consolidated feed in My NewsFeed page which displays all the colleague activity events that I have subscribed to and the other is my published feed that appears in MyProfile page in my Recent Activities.

What if we want to have our own custom type here. I faced this requirement in my current project where I was supposed to show an event in the feed when a user changes a theme. In other words, if my colleague changes some theme , then I should be notified the same in my activity feed and vice versa.


To handle this scenario, we need to create a custom activity type in our newsfeed settings. But how this can be achieved?

I hope by now you must be clear of the exact requirement. To shorten up the long conversation, lets dive directly into the steps that will achieve the desired result.

In this series of blogs I will be explaining how to create a custom activity type, what happens behind the scenes in the Database and what challenges do we face when creating the feed.

To start with, we firstly need to create a custom ActivityApplication for our custom ActivityType.

Create a feature and add an event receiver that will create your custom ActivityApplication on the Feature activation.

SPServiceContext context = SPServiceContext.GetContext(elevatedSite);
UserProfileManager profileManger = new UserProfileManager(context);
UserProfile currentProfile = null;
Microsoft.Office.Server.ActivityFeed.ActivityManager actManager = null;

try
{
      if (profileManger != null)
           currentProfile = profileManger.GetUserProfile(WindowsIdentity.GetCurrent().Name);
}
catch (Exception ex)
{
}
try
{
     if (currentProfile == null)
    {
          if(web.CurrentUser.IsSiteAdmin)
                  currentProfile = profileManger.GetUserProfile(web.CurrentUser.LoginName);
     }
 }
 catch (Exception ex)
 {
  }
 if (currentProfile != null)
    actManager = new Microsoft.Office.Server.ActivityFeed.ActivityManager(currentProfile,context);
if (actManager != null)
{
     ActivityApplication actApplication = EnsureActivityApplication(actManager);
    if (actApplication != null)
    {
         ActivityType customActivityType = actApplication.ActivityTypes["ActivityThemeType"];
        if (customActivityType == null)
        {
             customActivityType = actApplication.ActivityTypes.Create("ActivityThemeType");
             customActivityType.ActivityTypeNameLocStringResourceFile = "CustomActivityType";
             customActivityType.ActivityTypeNameLocStringName = "ActivityName";
             customActivityType.IsPublished = true;
             customActivityType.IsConsolidated = true;
             customActivityType.AllowRollup = true;
             customActivityType.Commit();
             customActivityType.Refresh(true);
         }
         ActivityTemplate customActTemplate = customActivityType.ActivityTemplates[ActivityTemplatesCollection.CreateKey(false)];

        if (customActTemplate == null)
        {
            customActTemplate = customActivityType.ActivityTemplates.Create(false);
            customActTemplate.TitleFormatLocStringResourceFile = "CustomActivityType";
            customActTemplate.TitleFormatLocStringName = "Activity_Created";
            customActTemplate.Commit();
            customActTemplate.Refresh(true);
        }
    }
}
public ActivityApplication EnsureActivityApplication ( Microsoft.Office.Server.ActivityFeed.ActivityManager activityManager)
        {
            ActivityApplication app = null;
            if (activityManager != null)
            {
                //Check to see that the current user has permissions to access the social data 
                if (activityManager.PrepareToAllowSchemaChanges())
                {
                    app = activityManager.ActivityApplications["ActivityThemeApplication"];
                    if (app == null)
                    {
                        app = activityManager.ActivityApplications.Create("ActivityThemeApplication");
                        app.Commit();
                        app.Refresh(true);
                    }
                    return app;
                }
                else
                {
                    try
                    {
                        //The process user doesn’t have access to profiles service as manage social data role 
                        return activityManager.ActivityApplications["ActivityThemeApplication"];
                    }
                    catch (ActivityFeedPermissionDeniedException ex)
                    {
                     }
                }
            }
            return app;
        }

In the above code snippet , we are first fetching the UserProfile and then creating an instance of ActivityManager. After that we check whether ActivityApplication exists or not and if it does not exist then we create a new ActivityApplication for our custom activity type. After that we create a custom activity type and custom activity template. You need to make sure that you are using the correct permissions to perform the above operation so as to avoid Access Denied issue.

You can also see the Resource files that I have been using above. It basically helps you in setting the name and message for your custom Activity Type.


Now, a custom activity type with the name Theme Change will appear in our NewsFeed Settings page and the message that will appear will be as {Publisher} changed theme to {Value} where the {Publisher} will be replaced by the colleague account name and in {Value} we will populate the name of the Theme.

So, in this way, we can create a new custom Activity type in our newsfeed setting page. But this is not enough. We still need to implement the logic to create an event for the same so that it can be made available in the newsfeed.

Stay Tuned for the next part where I will explain you the logic to create activity events. :)


Missing SitePages in Personal Site


Lately I faced and issue while working with Personal Sites. My requirement was to deploy a page in personal sites everytime a personal site gets created. So, the quick solution that came to my mind was to deploy it using feature stapling, and everytime the personal site gets provisioned for somebody, the feature will get activated and my page will get deployed to the SitePages library in the personal site that gets created. To my utter surprise, there was no SitePages library in my personal site though it was present in the MySite host. Then I found out that "Wiki Page Home Page" feature , which activates by default for Team Sites ,do not get activated by default for certain site templates, including the personal sites. Therefore , personal sites do not contain SitePages library by default. In-case we want to create SitePages library in personal sites then in our feature activation we need to write the following line of code that ensures creation of the SitePages library.

SPList list = web.Lists.EnsureSitePagesLibrary();


And thats it. This will create SitePages library for a non team site. :)

Cheers,
Geetanjali

Configuring Failover Database in SharePoint 2010


Amongst the various new features introduced in SharePoint 2010, Fail over database is a one. SharePoint 2010 is mirroring aware. This means that their is high availability of database if you have done the database mirroring at SQL level and have set the failover instance for your database at SharePoint level.

In simple terms, it means that if the connection to the primary database fails then it will automatically try to connect to the failover database instance and thereby ensuring high availability and minimal downtime.

You will have to configure the database mirroring first before proceeding with the failover database configuration. Once you have configured database mirroring at SQL level, there are two ways in which you can configure the fail over database , using Central Administration or by Powershell. But the powershell approach is more efficient as it gives you the ability to create a failover instance for config DB as well.

I will be discussing with both the approaches here.

Powershell Approach

$database = Get-SPDatabase | where { $_.Name -eq "SharePointDBName" }
$database.AddFailoverServiceInstance("FailoverSQLServerName")
$database.Update();


The Get-SPDatabase​ returns all the databases and by applying where { $_.Name -eq "SharePointDBName" }​ , you can specify which database you want to retrieve.


Once you have retrieved the database instance, you add the Failover server instance to the database and update it. This will add the failover database to your sharepoint content database.


Central Admin 

In central admin, in your manage content databases settings as well there is an option to provide the fail over database. But powershell is a recommended approach as it gives you more flexibility.


In this way you can configure a failover database in SharePoint 2010. :)


Happy Reading !

Geetanjali

Configuring navigation settings in sandbox solution


Hello Kind Readers,

Recently I came across with a scenario where I had the requirement to configure the Navigation Settings (available in the Look And Feel section) so as to have different quick launch or current navigation for different subsites. It seemed to be a quite simple task where you can make use of the PublishingWeb class and set the desired properties to configure global as well as current navigation.


The above image shows the Navigation option in the Look and Feel section in site settings.


The below screenshot shows the navigation settings page from where the user can manually configure the navigation options.


Following piece of code briefly explains how this can be done


PublishingWeb pubWeb = PublishingWeb.GetPublishingWeb(currentweb);
//Include pages in the quick launch
pubWeb.Navigation.CurrentIncludePages = true;
//Include subsites in the global nav
pubWeb.Navigation.GlobalIncludeSubsites = true;


But here comes a twist when you work as a part of sandbox solution. The PublishingWeb class is a part of the Microsoft.SharePoint.Publishing assembly which is not available in sandbox. As a result, you cannot use this class to configure the navigation settings. Then how can we configure these settings in the sandbox solution. 

After much exploring through reflector and sharepoint manager, finally sharepoint manager came to my rescue. I tried to do the settings through UI and observed what was happening behind the scenes to the various properties of SPWeb property bag. My findings were that there are few properties like below whose value changes when we modify the various settings in the Navigation Settings page.


__CurrentNavigationIncludeTypes :- The value of this property changes when we try to select the     various options in the Current Navigation section. The various possible options are 0, 1, 2, 3

     0 indicates that in structural navigation , nothing is selected

     1 indicates that in structural navigation, Show Subsites is checked and Show Pages is unchecked

     2 indicates that in structural navigation, Show Subsites is unchecked and Show Pages is checked

     3 indicates that in structural navigation, Show Subsites is checked and Show Pages is also checked


__GlobalNavigationIncludeTypes :- The value of this property changes when we try to select the various options in the Global Navigation section. The various possible options are 0, 

     0 indicates that in structural navigation , nothing is selected

     1 indicates that in structural navigation, Show Subsites is checked and Show Pages is unchecked

     2 indicates that in structural navigation, Show Subsites is unchecked and Show Pages is checked

     3 indicates that in structural navigation, Show Subsites is checked and Show Pages is also checked


__InheritCurrentNavigation :- This property if set to true inherits the parent navigation in the child web.


__NavigationShowSiblings :- This property is a boolean value that represents whether the web should display the siblings.


__IncludeSubSitesInNavigation :- This property is common to both global navigation as well as current navigation. As the name suggests, it will include subsites in the global as well as current navigation.


__IncludePagesInNavigation :- This property is common to both global navigation as well as current navigation. As the name suggests, it will include all the pages in the global as well as current navigation.


Now, in my scenario, the global as well as current navigation was supposed to be different. Following is the piece of code


public const string InheritCurrentNavigation = "__InheritCurrentNavigation";
        public const string CurrentNavigationIncludeTypes = "__CurrentNavigationIncludeTypes";
        public const string NavigationShowSiblings = "__NavigationShowSiblings";

        public override void FeatureActivated(SPFeatureReceiverProperties properties)
        {
            try
            {
                SPWeb web = properties.Feature.Parent as SPWeb;
                if (web.IsRootWeb != true)
                {
     //Set child web not to inherit from parent web
                    if (web.GetProperty(InheritCurrentNavigation) != null)
                    {
                        web.DeleteProperty(InheritCurrentNavigation);
                        web.AddProperty(InheritCurrentNavigation, bool.FalseString);
                    }
                    else
                    {
                        web.AddProperty(InheritCurrentNavigation, bool.FalseString);
                    }
     if (web.GetProperty(NavigationShowSiblings) != null)
                    {
                        web.DeleteProperty(NavigationShowSiblings);
                        web.AddProperty(NavigationShowSiblings, bool.FalseString);
                    }
                    else
                    {
                        web.AddProperty(NavigationShowSiblings, bool.FalseString);
                    }
     //Setting the current navigation to show only pages
                    if (web.GetProperty(CurrentNavigationIncludeTypes) != null)
                    {
                        web.DeleteProperty(CurrentNavigationIncludeTypes);
                        web.AddProperty(CurrentNavigationIncludeTypes, 2);
                    }
                    else
                    {
                        web.AddProperty(CurrentNavigationIncludeTypes, 2);
                    }
                    web.Update();
                }
            }
            catch (Exception ex)
            {
            }
        }

With the help of above properties, you can easily configure navigation settings in a sandbox solution as well. You can explore more properties with the help of SharePoint Manager. Hope this helps. :)


Cheers,
Geetanjali


Multi tenancy in SharePoint 2010


​SharePoint 2010 provides some new features to support Hosting Environment, in simple terms Multi-tenant support. Multi-tenancy is all about of isolation of data , services, administration etc. It involves a unique deployment for a customer/tenant on a shared set of resources. In multi-tenancy, we have multiple customers/tenants who share the same infrastructure, some shared services with no data and some shared services with patitioned data. In 2007, there were some inherent problems while doing Multi-tenancy and true isolation was not possible but in 2010 the limitations were overcome and we have a beautiful Multi-tenant feature available for us to be leveraged to our customers.

Now the most important thing is Why Multi-tenancy ?

As you have read , multi-tenancy involves sharing of resources that means we have less hardware cost. Its like a pooling of a car where the same amount of petrol is being used to reach from source to destination but shared among every person sitting in the car thereby being cost effective. So, we share resources with other tenants. But the beauty here is that there is complete isolation of data. Consider a scenario, there are 5 schools who have a SharePoint portal for their students. They have the same features deployed and configured on their portal. The only difference is in the data, they all have different students accesing the same. So, here we can set up a multi-tenant hosting enviroment for all the 5 schools, where they will be using the same infrastructure but will have complete isolation of data from each other. They all will have a single User Profile Service Application which will be available in partitioned mode so that student from School 1 cannot access the portal of School 2. Also there is a centralised control over hardware. Now to manage 5 customers, we don't have to manage 5 independent infrastructures. We simply need to manage one. :)

Also there is an admin site available in multi-tenant environment for each tenant where he can create new sites and perform administration stuff. If you remeber, i normal SharePoint environment, if we were using User Profile Service Application, then in order to manage any user profile we simply used to go to the Central Admin Manage Profiles, and there we had that beautiful option to Manage User Profile. But this is not available in Multi-tenant because we don't want admin from one school sees the users of the other school or to isolate one tenant data from the other tenant. Here comes the tenant admin site in picture. For every tenant, in their admin site, they have the provision to manage user profiles. So this feature is available in tenant admin site instead of the Central Admin to ensure isolation.


In the above screenshot, if you see there are 4 customers i.e. 4 independent web-applications in 4 different sharepoint farms. This is the scenario where we are provisioning one farm per customer.  


However in this second screenshot, we have a single farm whoch host all the 4 customers for us. These customers are called tenants, who share the same services but in partitioned mode.
Also there is a very important term in multi-tenancy and that is Site Subscription. Site subscription is the
logical grouping of site collections that can share resources. Now, each tenant has a subscription ID that differentiates it from the other tenant. The subscription ID is used to map features, services, and sites to tenants and also to partition service data according to tenant.  Now, these site subscriptions can be created using powershell or using object model.

There is also a new concept that is introduced with multi-tenancy and that is the Feature Pack. If you create any feature in multi-tenant environment, then that feature is not available in the default list of your features available in your web or site scoped  features. To make your feature available there you need to create a feature pack and  include your feature in the feature pack and then associate that feature pack with your tenant. This concept is very interesting in terms that you can provide different features to different tenants in an ala-carte manner. I will write a new blog post solely on feature packs later.

So, these are the very basics of multi-tenancy in SharePoint 2010. I hope after reading this blog post you will get some basic idea around this concept.


Cheers,
Geetanjali

"Invalid data has been used to update the list item. The field you are trying to update may be read only" error while updating list item.


When working with SharePoint object model  normally you encounter this error when you are trying to update a list item programmatically for a lookup or a people picker type field.
Below I have described how we should go ahead to update listitems for these two types so as to avoid the error.

Lookup Type Field Column

public static SPFieldLookupValue GetLookupFieldFromValue(string lookupValue,string lookupSourceColumn, SPList lookupSourceList)
       
            {

                    SPFieldLookupValue value = null;
                    SPQuery query = new SPQuery();
                    query.Query = "<Where><Eq><FieldRef Name='" + lookupSourceColumn + "'/><Value Type='Text'>" + lookupValue +  "</Value></Eq></Where>";
                   
                    SPListItemCollection listItems = lookupSourceList.GetItems(query);
                    if(listItems.Count > 0 )
                        value = new SPFieldLookupValue(listItems[0].ID,lookupValue);
                    return value;
            }

lookupValue : Value you want to assign to your item.
lookupSourceColumn : Column name from the source list that you are using as a lookup
lookupSourceList : Name of the source list which is having the column that acts as a datasource for the lookup type column

Now simply refer to the above method and use it to assign it to your list item of lookup type.

item["LookupField"] = GetLookupFieldFromValue(lookupfieldValue, lookupSourceColumn, listName);


People/User Type Field Column

SPUser user = web.EnsureUser(loginName);
                 
item["UserTypeFieldName"] = user;

Updating in this manner will wipe out the fear of lookups and people picker fields. Enjoy Coding :)

Regards,
Geetanjali

Firing events inside a modal dialog in SharePoint 2010


Lately I came across a requirement where I had to fetch user input and based on that perform some validations on the click event. All of this was supposed to happen inside a modal dialog inside SharePoint 2010. Initially it seemed quite simple but when I started to do it I really had to struggle to get the click event functional inside the modal popup.

Before diving more into the issue let me brief you about the Modal dialog in SharePoint 2010. It is a new dialog framework that is provided using javascript client object model. You must have seen a dialog box that opens up on editing a list item or adding a new item with some lightbox effect. That is what I am talking about here. :)

Diving into some more details here, the javascript client object model has a class SP.UI.ModalDialog that has quite a number of useful methods that help us interact with the dialog framework. One such useful method is the showModalDialog() that accepts a parameter of an object named options.
This options is the heart of this method.

var options ={
url: 'some url',
title:'SharePoint 2010 Modal Dialog',
width:100,
height:150,
dialogReturnValueCallback: closeDialog
};

Now if you have a look at above code snippet, it is quite simple and clear.

url : url of the page that appears in the dialog
title: title of the dialog box
width: width of the dialog box
height: height of the dialog box
dialogReturnValueCallback: It is the return callback function.

To show the dialog box you need to do the following

SP.UI.ModalDialog.showModalDialog(options);

Now , if you can recall, above I mentioned that url is the url of the page that gets displayed in the modal dialog. But there is one more option available here. We have an option called html as well where we can specify the html of that we want to show in the dialog box.

There are many more options that are available OOB that you can refer from msdn.

Coming back to my requirement, I had to take an input from the user and on the click event perform some validations inside the modal dialog. Also in my dialog I was using the html attribute of the options rather than showing some page. Now the problem with this was how to bind the script that will perform my onclick event inside the html markup. The html string is simply not a string but the DOM element that we will be showing in the dialog.

Now, the way it works is that we need to do document.createElement to create the DOM elements in memory. I did the document.createElement for my parent div container and added rest all child elements inside it as a template. But my on click event was not working. So I realised that I need to do document.createElement for script as well.

It made me think that if we are going to do document.createElement for every element then it will be really painful. So I did some R&D and came across an interesting blog where the approach suggested was to put the markup in the script tag with attribute set as "text/html". After that create the DOM in the memory using Jquery with the help of the markup specified in the script tag.

Here interesting thing is using type as "text/html" . If we put unsupported types in the type attribute for the script then the content of the script is ignored. This is normally used to render data that is not loaded to the page. This type of script is treated by browse as a div with style= display:none.

So, enough talking and lets have some practical implementation

function CheckValidations() {

//Logic to check the validations

}

function openDialog() {
    var options = SP.UI.$create_DialogOptions();
    options.title = "Save Image";
    options.width = 400;
    options.height = 250;
    options.html = createHtml();
               
    SP.UI.ModalDialog.showModalDialog(options);
 }

 function  createHtml () {

     var htmlDiv= jQuery(jQuery('#parentDiv').html());
      htmlDiv .find('#btnOk').on('click', function () {
           CheckValidations();

     });

     return  htmlDiv .get(0);
 }


//The markup will be something like below

<script type="text/html" id="parentDiv">
    <div>
        <label for="PictureName">Picture Name :</label>
        <input type="text" id="txtPictureName"/>
        <input type="button" id="btnOk" value="Ok"/>
        <div id="errorDiv" ></div>
    </div>
</script>

Now from your code wherever you want to open this dialog, on the click event simply call the openDialog() method and you are good to go.

Modifying the list view using ECMASCRIPT


​Lately I came across a requirement where I was supposed to modify the list view using javascript client object model. The requirement was that I had to fetch a view of a list from sharepoint which had certain fields in it which were not there in the existing view of the list. Now the problem was that how much hard I tried to update the view and set the view query for the view fields of my interest it was not getting updated. When I tried to debug my javascript in the browser my query was actually updating the view fields but the view was not getting updated.

Below is what I was trying


var query = "<View><ViewFields><FieldRef Name='Field1'/><FieldRef Name='Field2'/><FieldRef Name='Field3'/></ViewFields></View>";

var views = list.get_views();

var view = views.getByTitle("All Items");

view.set_viewQuery(query);

view.update();

So after some playing around with javascript, I came up to an approach that was able to update the view as per my desired view fields.

var views = list.get_views();

var view = views.getByTitle("All Items");

view.get_viewFields().removeAll();
view.get_viewFields().add("Field1");

view.get_viewFields().add("Field2");

view.get_viewFields().add("Field3");

view.update();


Doing this will add the desired fields to the view and fetch them. There is one flaw with this approach however. It will modify the existing view on the list. In case you donot want that to happen then you can try creating a custom view based on the existing view. I have not tried that its a thought.

It was something that I struggled for a few hours so making a note of it through this post. :)


-Geetanjali

Fetching the list view using ECMASCRIPT


Hi Kind Readers,

This is the first blog from me on OFFICE 365. So maybe what I am trying to tell here is quite simple who everybody working on sandbox solutions know but since I am new to this domain everything seems to me worth sharing. :)

Lately I had a requirement where I had to create a custom webpart which will show the data from the list and will be able to perform various list operations.

I thought of various options like creating a custom webpart that will have the entire html dynamically generated or can think in terms of having something like a list view webpart. Now in sandbox ListViewWebpart class is not available. So, I thought of giving the second approach a try and see how to work with SP.View and fetch this generated view and bind it as html in the webpart.

function getMyList() {

        var ctx = SP.ClientContext.get_current();

        var web = ctx.get_web();

        var list = web.get_lists().getByTitle("ListName");

        var views = list.get_views();

        var view = views.getByTitle("All Items");

        view.update();

        ctx.load(view);

        myview = view.renderAsHtml();

        ctx.executeQueryAsync(OnSuccess, OnFailure);

 }

function OnSuccess() {

        myview = myview.get_value().toString();

        jQuery("div id").append(myview);

 }

function OnFailure() {

 }

In the above code snippet , I am fetching the OOB All Items view and then rendering it as HTML and then finally binding the generated html to the div in the webpart. This will help us creating a custom webpart similar to a list view webpart using Client Object Model. :)


Cheers,

Geetanjali

"This content type is already in use" error while deleting content type


If you have been working on SharePoint and playing with content types and lists (which I am very sure you all must have) then "This content type is already in use" is a nightmare that you can think of when trying to delete a content type.
As the name suggests, this error indicates that the content type is in use somewhere and you cannot delete it. Lets say that we have created a list and we have attached a content type to it. Now if we want to delete the content type , then 
1. normally we first delete the content type association with the list 
2. and then we delete the list 
3. and finally delete the content type.

If you miss the first step and delete the list directly, you get stuck with an orphaned association.
This will generate the above error when you try to delete the content type.
 Every time I get this error, I used to avoid the situation and went for an easy approach to deploy it to a new web application. That's an easy job. But I had sometime today to look deeper into the issue and try to fix it for once and for all.
So what could actually be the issue. Well, we know that the content gets stored in content database in sharepoint so all this information like list, content types and their association must be getting stored in database. That means that when we delete the list then its entry is getting deleted from the database but somewhere the association between content type and list remains that prevents us from deleting the content type.
But where is that information stored? In search for an answer I came across this wonderful blog by Tyler Homes :

http://blog.tylerholmes.com/2008/02/deleting-content-types-in-sharepoint.html


He has mentioned in his blog about the table in the wss content database where this association is stored.

ContentTypeUsage : is our table of interest that holds all the associations between the list and the content type. Query this table for the problematic content type. Delete all the associations and you are good to go.


Below query will help you fetch the association between the lists and the content type.

select * from ContentTypeUsage WHERE (sys.fn_varbintohexstr(ContentTypeId) LIKE 'Content Type ID%')​

Once you get the associations, just remove them and you are good to go. Now if you will try deleting the content type, you will be able to do it in one go.​

Thanks to Tyler for his cool blog.